


Flash firmware on Panasonic Eluga X1 Pro
Mobiles >> Panasonic >> Panasonic Eluga X1 Pro| Specifications | Reviews | Secret codes |
| Unlock phone | Root phone |
| Backup | Flash Firmware | Screenshot |
| Hard Reset |
How to flash Panasonic Eluga X1 Pro?
Why reinstall the firmware?
Errors periodically appear in the Android operating system.
Some applications stop opening.
Some applications from the Play Market do not start.
The phone turns off for no apparent reason.
The phone is slow.
You have decided to try a different version of Android.
Where can I find the firmware?
On the official website of the manufacturer.
On certain sites where developers post custom or official OS.
What should be done before installing the firmware?
Back up your contacts and user data and transfer it to your computer.
Insert your SD card into your phone. It must have enough memory to fit the firmware.
Find out the exact model of your smartphone.
Fully charge your device's battery.
Find and download the archive with Firmware. And place it on the SD card.
Installing TWRP Recovery
Download the Official TWRP App to your phone from the Play Market. And install this app.
When you start the application for the first time, you must consent to future manipulations, as well as consent to granting the application Superuser rights. Check the checkboxes and press the 'OK' button.
In the next screen, select the item 'TWRP FLASH' and provide the application with root-rights.
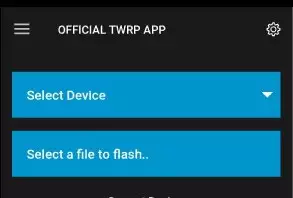
On the main screen of the application, click on the 'Select Device' drop-down list, and select your phone model.
After selecting the phone, the application will redirect the user to a web page to download the modified recovery environment image file. Download the proposed *.img file.
After downloading the image file, return to the main screen of the Official TWRP App and press the 'Select a file to flash' button. Then we tell the program the path where the file loaded in the previous step is located.
Press the 'FLASH TO RECOVERY' button and confirm your choice, press 'OK'.
After the burn process is complete, the message 'Flash Completed Succsessfuly!' appears. Click 'OK'. The TWRP installation procedure can be considered complete..
Transfer the necessary files to the SD card. Using a PC or laptop card reader.
Insert a SD memory card into the phone.
To reboot into recovery, you need to use a special item in the Official TWRP App menu, accessible by pressing the button with three stripes in the upper left corner of the main screen of the application. Open the menu and select the 'Reboot' item, and then click on the 'REBOOT RECOVERY' button.
Firmware via TWRP
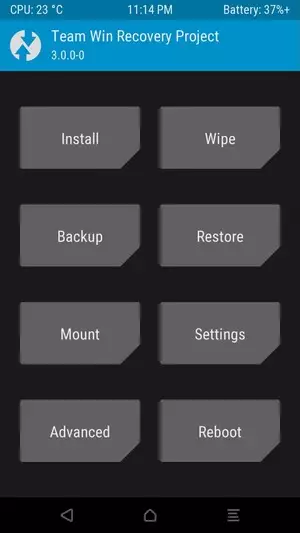
Before flashing, you need to clear the 'Cache' and 'Data' sections, press 'WIPE' on the main screen. This will delete all user data from the device, but avoid a wide range of software errors and other problems.
Press the 'Install' button to start the flashing.
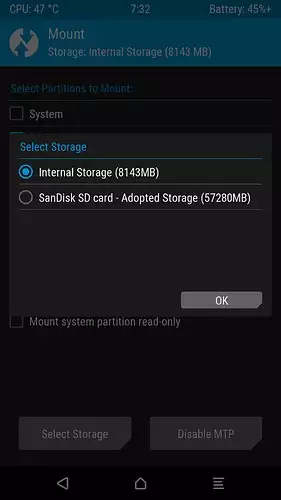
The file selection screen is displayed. At the very top is the 'Storage' button, select the location where the firmware file is located.
Select the location where you copied the files. Press the OK button.
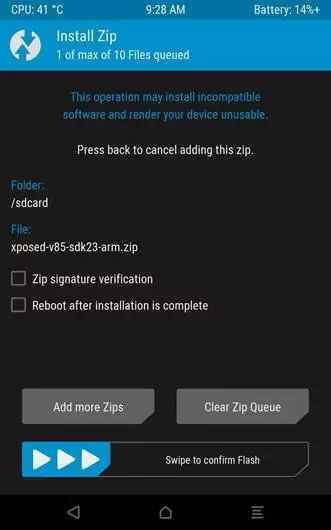
Find the file we need and click on it. A screen opens with a warning about possible negative consequences, you need to check the item 'Zip signature verification', which will avoid using corrupted files when writing to the phone's memory sections.
The procedure for writing files to the device's memory will begin, accompanied by the appearance of inscriptions in the log field and the completion of the progress bar.
After completing the installation procedure, a 'Successful' message appears on the screen.
Summary: Smart Phone OS: Android 8.1 (Oreo); Chipset: Mediatek MT6771 Helio P60 (12 nm); CPU: Octa-core (4x2.0 GHz Cortex-A73 & 4x2.0 GHz Cortex-A53); GPU: Mali-G72 MP3; Type: IPS LCD capacitive touchscreen, 16M colors; Screen Size: 6.18 inches, 96.2 cm2 (~82.2% screen-to-body ratio); Resolution: 1080 x 2246 pixels, 18.7: 9 ratio (~403 ppi density); Multitouch: Yes; Protection: Corning Gorilla Glass 3; Card slot: microSD, up to 256 GB (uses SIM 2 slot); Internal: 128 GB, 6 GB RAM (Eluga X1 Pro) or 64 GB, 4 GB RAM (Eluga X1); Alert types: Vibration; MP3, WAV ringtones; Loudspeaker: Yes; 3.5mm jack: Yes; WLAN: Wi-Fi 802.11 а/b/g/n, dual-band, WiFi Direct, hotspot; Bluetooth: 4 ...
Comments, questions and answers on the flash firmware Panasonic Eluga X1 Pro
Ask a question about Panasonic Eluga X1 Pro