


Flash firmware on MSI Windpad Primo 81
Mobiles >> MSI >> MSI Windpad Primo 81| Specifications | Reviews | Secret codes |
| Unlock phone | Root phone |
| Backup | Flash Firmware | Screenshot |
How to flash MSI Windpad Primo 81?
Why reinstall the firmware?
Errors begin to appear in the Android operating system.
Some installed applications do not open.
Some applications from the Play Market do not start.
The phone shuts down and restarts for no apparent reason.
The phone is slow.
You are not satisfied with the functionality of the stock firmware.
Where can I find the firmware?
On the official Internet resource of the phone manufacturer.
On certain sites where developers post custom or official OS.
What should be done before installing the firmware?
Back up your contacts and user data and transfer it to another medium.
Insert an SD card into your phone to write the firmware to it.
Find out the exact model of your smartphone.
Fully charge your phone battery.
Find and download the archive with Firmware. And place it on the SD card.
Installing TWRP Recovery
Download the Official TWRP App to your phone from the Play Market. And install this app.
When you start the application for the first time, you must consent to future manipulations, as well as consent to granting the application Superuser rights. Check the checkboxes and press the 'OK' button.
After moving to the next screen, select the 'TWRP FLASH' item and provide the application with root rights.
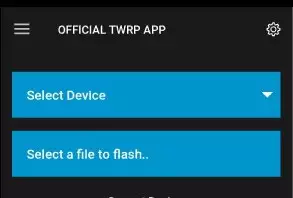
On the main screen of the application, the 'Select Device' drop-down list is available, in which you need to find and select the device model for installing the recovery.
After selecting a device, the application will direct the user to a web page to download the appropriate modified recovery environment image file. Download the suggested *.img file.
After downloading the image file, return to the main screen of the Official TWRP App and press the 'Select a file to flash' button. Then we tell the program the path where the file loaded in the previous step is located.
After adding the image file to the program, click the 'FLASH TO RECOVERY' button and confirm your choice, click 'OK'.
After the burn process is complete, the message 'Flash Completed Succsessfuly!' appears. Click 'OK'. The TWRP installation procedure can be considered complete..
Transfer the necessary files to the SD card. Using a PC or laptop card reader.
Insert a memory card into the phone.
To reboot in recovery, it is convenient to use a special item in the Official TWRP App menu, accessible by pressing the button with three stripes in the upper left corner of the main screen of the application. We open the menu, select the 'Reboot' item, and then tap on the 'REBOOT RECOVERY' button. The phone will reboot into the recovery environment automatically.
Firmware via TWRP
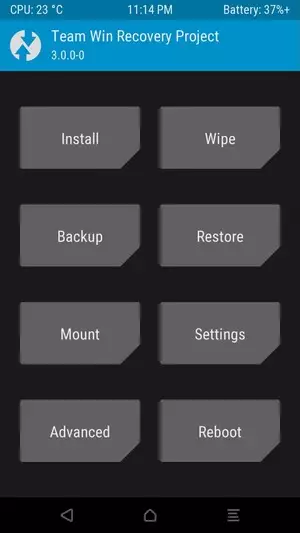
Before flashing, you need to clear the 'Cache' and 'Data' sections, press 'WIPE' on the main screen. You will delete all user data from the phone, this will avoid software errors and other problems.
Everything is ready to start flashing. Press the 'Install' button.
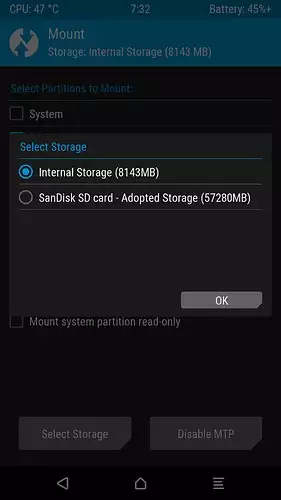
The file selection screen appears. At the very top there is a 'Storage' button for selecting an SD card.
Select the location where you copied the files. Press the OK button.
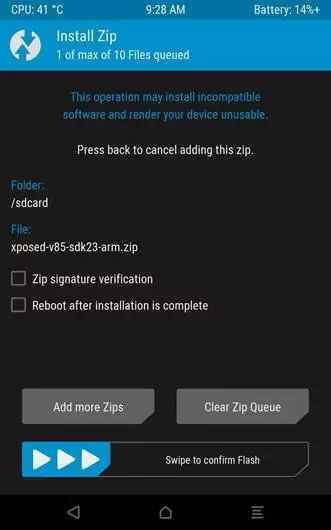
Find the file we need and click on it. A screen opens with a warning about possible negative consequences, as well as the item 'Zip signature verification'. This item should be checked by placing a cross in the check-box, which will avoid using damaged files when writing to the phone's memory sections.
The procedure for writing files to the phone's memory will begin, this is accompanied by the appearance of inscriptions in the log field and the movement of the progress bar.
The completion of the installation procedure is indicated by the inscription 'Successful'.
Summary: Operating System: Android v4.2 (Jelly Bean); Dimensions: 200.2 (H) x 135 (W) x 7.82 (T) mm; Weight: 330 grams; Colours: White; Screen Size: 7.85 inches; Screen Resolution: 768 x 1024 pixels; Pixel Density: 163 ppi; Display Type: IPS LCD; Touch Screen: Capacitive Touchscreen, Multi-touch; Processor: Quad core, 1 GHz; Graphics: PowerVR SGX 544MP2; RAM: 1 GB; Internal Memory: 16 GB; Resolution: 2 MP; Image Resolution: 1600 x 1200 Pixels; Camera Features: Digital Zoom; Video Recording: 1920x1080 fps; Resolution: 0.3 MP; Camera Features: Fixed Focus; Battery capacity: 3500 mAh; Type: Li-ion; Wi-Fi: Wi-Fi 802.11, b/g/n; USB Connectivity: microUSB; HDMI ...
Comments, questions and answers on the flash firmware MSI Windpad Primo 81
Ask a question about MSI Windpad Primo 81